February 14, 2013

Crafty Valentines...

I've always loved Valentines Day, I especially love being crafty. Here are a few simply sweet Valentine ideas...

Encouragement Journal

Men love encouragement, so why not give them that gift each and every day! 


Sweet Treats Box

You can use any type of candy or food box you would like. I purchased a "take-out" box from Michael's. Use a cute tag to write a special note for your sweetie and attach it with nice string or ribbon. I cut strips of paper and folded them in half twice. On each strip I wrote a "Sweet Treat" (example: One Dinner and movie night of your choice). Once the paper was folded I sealed it with a tiny glue dot and attached a candy cutout on the front ( Candy cutouts are from the Martha Stewart Collection at Michael's, but you can also make yours). Once you complete your "Sweet Treats", place them in the box!
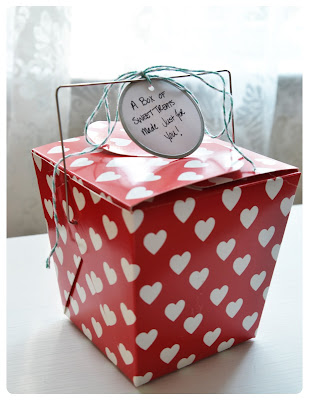
Sweet Treats Box

Sweet Treats- Folded paper and Candy cutouts


 Paper Wrapped Candy Bars

I did this for a tea party I held several years ago and loved it! Back then I used the Hershey's Chocolate bars with the silver wrapping. Unfortunately, they don't make them like that anymore... So I had to settle with the plastic wrap! I cut a piece of paper big enough to wrap around the candy bar and put a thin line of glue to attach the paper to itself on the back of the bar. You can also use thinner paper to wrap the entire bar like a package (I did this for the large candy bar seen on the far left side of the photo). Once you have wrapped your candy, you can decorate it however you'd like! This is a fun, affordable, and unique way to give a valentine to just about anyone!

Handmade Valentine Cards

These are pretty self explanatory. I LOVE making cards... you can use just about anything. I used a combination of old scrap paper from previous years, hand made cut outs, and a few new stick-ons I found at Michael's this year! The only rule is to have fun with it!


Thanks for reading!! Make sure to visit again soon for new creative organizing & decorating ideas!


November 12, 2012

"Be Thankful" Fall Decor

As a continuation of my previous Fall Decor post, here are my latest ideas for a month filled with Thankfulness!

 The first images are of the banner I made for our mantel. Using burlap, I traced and cut out ten triangles to make the actual banner. I then traced circles using a candle lid (any small lid will work), cut them out, and used Martha Stewart monogram stencils and white paint to stencil the appropriate letters onto my circles. Using another stencil, I added a small detail around each letter. The letters were then attached to the burlap triangles with "glue dots"(found at any craft store)- this prevents any mess from regular glue. Each triangle was tied together by a small piece of twine. To separate the words "BE" and "THANKFUL", I just tied a small bow using orange ribbon and leftover twine.

Cutting burlap triangles and paper circles

Stenciling letters onto each circle

"BE THANKFUL", always.


These next images are of the "November Activity Jar" full of fun weekly activities! My husband and I came up with several small activities for weeknights and weekends, jotted them down on fun colorful paper, folded and placed them in a mason jar. I cut a small piece of orange fabric into a circle slightly larger than the lid, attached the fabric to the lid using a few glue dots, then placed the lid and the fabric into the metal band that screws onto the jar. I made a fun label using a pre- cut tag and twine. This is a fun activity for families of any size- great for kids too!

Lid and paper activities

Completed Activity Jar 

Lastly, these are our "Thankful Branches" to help us remember to be thankful everyday. Using  pre-cut labels from Michael's, my Husband and I are taking a little time each day to write down one thing we are thankful for. We each use one side of a tag. Then using twine, we hang them on branches I have placed in a large mason jar. I love this because it doubles as our dining room table centerpiece... we are able to see it every time we sit to eat and are constantly reminded of all the blessings in our life! This is another fun activity, doubling as beautiful fall decoration!

Thankfulness Labels and Branches

Centerpiece
Thanks for reading!! Have a Happy Thanksgiving and daily remember every little blessing! Don't forget to visit the website - www.tylerdrobinett.com

October 24, 2012

Chalkboard Labels

I recently worked on a project for a client that required labels. We decided that Chalkboard paint would be fun considering they have kids. First I took one piece of 3"x4" basswood and using a ruler and cutting board, measured how big I wanted each label to be. I then used a small blade to cut out each individual piece. Before applying the paint, I used a drill with a small drill bit to make two holes in each label in order to thread the twine. I then painted 2 coats of black chalkboard paint on each (you can find it in other colors as well). I used a small artist brush to paint the sides. While the paint was still wet, I used a toothpick to clear out the holes I drilled so the paint would not dry in them. Finally, once the labels dried, I cut two pieces of twine for each label (making them long enough to tie onto a basket). I ran into a small problem, the holes I drilled were too small for the twine and it would get caught and fray when I tried to pull it through. To fix this little problem, I just dabbed a small amount of glue onto my fingers and twisted the end of the twine I wanted to pull through the hole. Once the holes were threaded, I made a small knot on the front side of each label to keep the twine from pulling out.

Measuring, cutting, and holes drilled

Painting- using a toothpick to clean the holes

                                                           The finished product!
     Thanks for reading! Please visit again to see these labels in their new home!! The full project will be posted on www.tylerdrobinett.com shortly!

October 23, 2012

Time For Fall Decor!

I love fall, but I often get so bored of the typical decorations. When I started decorating for the season, I decided to spruce the typical look up a bit! Shown below is an old fall wreath we have had for years and some pumpkins I purchased. I found metallic spray paint in the color I wanted to use at Lowes and Hobby Lobby (one is just for extra sparkle). Everything seen here was under $30. Once I had all I needed, it was time to give my little decorations a  nice face lift!
Pumpkins and Wreath Before with metallic paint and "glitter blast"
Wreath After
Pumpkins After- Chose to let some orange show (bottom)
When I had finished painting everything else, I remembered some old candelabras in my storage closet. I used leftover white spray paint to recover the candelabras for a fresh new look. The image doesn't show them very well, but I also gave the twigs a nice "glitter blast".
Table Centerpiece with painted candelabras and twigs
                       Thanks for reading! Stay tuned for more fun fall decorating ideas! And be sure to visit the website www.tylerdrobinett.com


September 19, 2012

Christmas Decorating!!

There is a spot for you on the calendar! Contact us on the website for a consultation and spread the word!


September 10, 2012

Stenciled Curtains


I've been a bit stencil crazy lately. There were a few more curtains I wanted in our home but just couldn't find exactly what I was looking for- so I decided to make my own! I purchased two packs of curtains from IKEA ($20-$25 each).  I then found stencils and paint I liked and went to work on each. 

This is the first of the two sets of curtains which I made for our dining room. This curtain is made up of 3 different stencils, each from Hobby Lobby.


 This is the second pair of curtains I did for our kitchen. I purchased the stencil and paint from Michael's- both are Martha Stewart.


Make sure to visit the website! www.tylerdrobinett.com

September 08, 2012

Entry Closet

This is a project I worked on over the past two weeks! Friends of ours desperately wanted to change their entry closet where they keep all of their shoes, winter coats and scarves, rain gear, pool essentials and many other miscellaneous items. Their desire was to have more storage and the ability to hang bags, umbrellas and coats. They wanted to make the space more than just a closet they throw their stuff when they came home - they wanted it to be a welcoming area. Here is a preview of the before shots and the process of the solution we came up with. To see more, please visit the Langan's page on our website!

This is what the closet looked like before
This is a preview of the work in progress
Visit the Langan's page for the end product!